On this blog, I've covered clothes, thrifting, DIY, decor, pets, cooking, and weddings. I have not however, covered beauty outside of a review of a beloved product. So I turned to an old friend who was and is my leading source for beauty. Kate Crisler has worked as a freelance makeup artist, hair stylist, and stylist since 2005 in commercial, HD TV, green screen, music videos, and print. Her experience ranges from the music scene in Nashville, TN to print campaigns in NYC, as well as entertainers to politicians in Philladelphia, PA.
I have known this lovely lady for what seems like forever. We went to church together from elementary school until high school, in between my family's bouts of moving. Not only is she an artist with a makeup brush, but the girl has the voice of an angel. Seriously. I still listen to her recordings from when she was in high school. Amazing.
When I saw this picture she posted, I knew I wanted her to do this tutorial on the blog. I would love to incorporate more beauty posts, and Kate would love to be a more regular part of the blog. So, give her some love so I can convince her to stick around.
You can use this styling method to create several different looks. However, in this tutorial I will be showing you how to create loose, voluminous, and soft waves. This is a great method for if you are traveling and have limited packing
space or when you need your hair to set while preparing for a party, or
if you have an early flight to catch and little time to get ready in
the morning: simply sleep with it over night!
In order to achieve that look, I chose to do this tutorial immediately after I washed and blow-dried my hair. (However you can also do it with wet hair and sleep on it for tighter curls.)
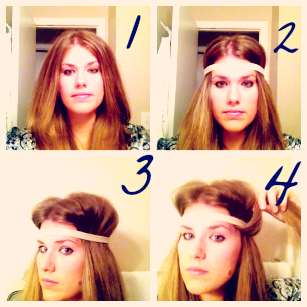
Step 1: Part your hair in the way you will choose to wear it when finished.
Step 2: Choose a loose headband, preferably a cloth one so that it will not pull your hair out, and place it on your head above your eye-brows.
Step 3: Fluff the hair above the headband to create volume.
Step 4: Pull a small section of hair on the right side, pull up and wrap it around the headband.

Step 6: Look closely in this picture and you will see that I combined the first section while grabbing a new second section, creating one large second section.
Step 7: Wrap the second section around the headband and pull tightly around the band.
Step 8: Add to the section again to make one larger piece.

Step 10: Picture should show back of head with space left for wrapping on the head band and both sides hanging down in the back. If you do not have space, then push the hair loops forward towards the face on the headband to create more room for the final pieces.
Step 11: Begin with the back right side and wrap the remaining hair around the headband until it is completely wrapped.
Step 12: Finish this on both sides until it completely wrapped. As you can see in the picture, there is no headband showing.

Step 14: Pull hair on the top of your head to again create fluff and volume.
Step 15: Spray lightly with hair spray to set the style, and use a blowdryer on the low setting to continue drying, if needed, and set the waves.
***Allow to set at least 45 minutes***
Step 16: Begin unrolling hair piece by piece from the back.

Step 18-19: Finish unrolling both sides, smooth waves with fingers, and take headband off.
Step 20: Use hair spray to set the waves and pin if you like!
The tighter you pull the hair around the headband, the tighter your curls, and the longer you allow them to set, the tighter they will be! Feel free to play with this hair method to create many looks!
For more on Kate

I love that this allows you to put your hair up and then go about finishing getting ready, cleaning the house, and then right before you leave, take it out and there you have beautiful waves! It's a pain sometimes sitting in front of the mirror with a curling iron waiting and waiting and waiting...
ReplyDeleteI'm definitely going to give this a try!
xo
Vanessa
Going to try this. Thanks for the toot!
ReplyDeleteLOVELY!
ReplyDeleteNOT fair, I tried this myself and I just ended up with big kinks on my hair! But yours looks GORGEOUS!
ReplyDeleteSooo gorgeous! I must try this! :)
ReplyDelete~Phuong
http://classypeach.blogspot.com/
So pretty! What a great technique to create waves without risk of heat damage from waving irons or hot rollers. :)
ReplyDeleteThis is such a unique idea and the results are absolutely stunning - I especially love how this doesn't use any heat. I adore my Remington Curling Wand for creating lovely curls but it is pretty damaging to my hair, as every curling/straightening iron is! I have followed your gorgeous and adorable blog, love :) There's a new post up on my own and I'd love to hear your thoughts on it so feel free to stop by! x
ReplyDelete♡, Fatima fashionpilgrim
Twitter: @fashpilgrim
Instagram: @fashionpilgrim
That turned out so well!!! Might have to try it...
ReplyDeleteOh my gosh, I'm going to try this tonight! Thanks for the tutorial! and thanks for stopping by my blog and taking the time to comment. (and follow :o)) I'm your newest follower!
ReplyDelete