Showing posts with label DIY. Show all posts

{How To} Home Made Cake Stand

19 November 2012

 The holiday season is upon us, and I'm not quite ready to dole out a ton of money for decor that's going to be out for 6 weeks. I LOVE Christmas, like cannot get enough, simply adore, amcompletelyobsessed. But I don't love spending money. I made a ton of these for my wedding last year, and then promptly sold them in the name of space and sanity. Now that we've settled and it's time for cakes and tasty goodies to be displayed, I thought I'd whip up another in the name of holiday spirit.

So, while at my local Goodwill last week, I spotted this large china platter for $1.50, and found this mercury glass candle holder for $9 at Marshalls and put two and two together. Literally.


What You'll Need:
Large Plate or Platter
Wide Base Candle Stick
Gorilla Glue

1. Lightly wet bottom surface of plate where candle holder will sit
2. Trace very thin line of Gorilla Glue around edge of top of candle holder
3. Place plate on top of candle holder and top with very heavy book 
4. Leave heavy book on top of plate overnight to ensure strong bond


{How To} Make Antler Art

14 November 2012

Micah owns our kitchen. He cooks, sometimes cleans, and generally knows where everything is. When it comes to decor, I make that 110% my domain. 

Micah desperately wanted one of his hunting trophies in our home. I protested for quite a while, until finally giving in with some conditions. I told him that if we hung antlers in the house, they'd be "Britt-ified." This means "Color, texture and not hunting lodge style". I brainstormed for a while until I came up with something that would fit nicely on our gallery wall and still suit his desire for horns in the house.

I call this: How To Girlify Dead Animal Heads

 Materials
Antlers
1 large silk flower
Hot glue gun
1. Strip leather from skull and paint wooden base with preferred color. I picked raspberry.
2. Separate all elements of flower, including stem and accompanying buds
3. Arrange design to find what setup works best for you and covers the skull
4Wrap greenery around side of skull, using pea sized dots of glue to secure
5. Place flower on skull, then secure with more pea sized glue drops, fully covering the skull.
6. Hang and enjoy!

Linking Up: RebeccaJen, Cindy,Ashley,TCB,Kristin, Kristyn, Kim,Trish/Bonnie,

{How To} Create Loose Waves

01 November 2012

On this blog, I've covered clothes, thrifting, DIY, decor, pets, cooking, and weddings. I have not however, covered beauty outside of a review of a beloved product. So I turned to an old friend who was and is my leading source for beauty. Kate Crisler has worked as a freelance makeup artist, hair stylist, and stylist since 2005 in commercial, HD TV, green screen, music videos, and print. Her experience ranges from the music scene in Nashville, TN to print campaigns in NYC, as well as entertainers to politicians in Philladelphia, PA. 

I have known this lovely lady for what seems like forever. We went to church together from elementary school until high school, in between my family's bouts of moving. Not only is she an artist with a makeup brush, but the girl has the voice of an angel. Seriously. I still listen to her recordings from when she was in high school. Amazing. 

When I saw this picture she posted, I knew I wanted her to do this tutorial on the blog. I would love to incorporate more beauty posts, and Kate would love to be a more regular part of the blog. So, give her some love so I can convince her to stick around.

You can use this styling method to create several different looks. However, in this tutorial I will be showing you how to create loose, voluminous, and soft waves. This is a great method for if you are traveling and have limited packing space or when you need your hair to set while preparing for a party, or if you have an early flight to catch and little time to get ready in the morning: simply sleep with it over night!
 In order to achieve that look, I chose to do this tutorial immediately after I washed and blow-dried my hair. (However you can also do it with wet hair and sleep on it for tighter curls.) 

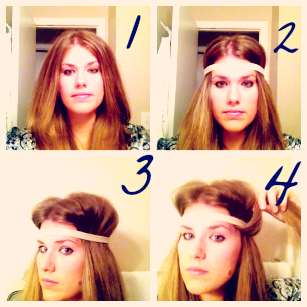
Step 1: Part your hair in the way you will choose to wear it when finished.
Step 2: Choose a loose headband, preferably a cloth one so that it will not pull your hair out, and place it on your head above your eye-brows.
Step 3: Fluff the hair above the headband to create volume.
Step 4: Pull a small section of hair on the right side, pull up and wrap it around the headband. 

Step 5: As shown in picture, pull the hair down from behind the headband until it is tightly wrapped around the headband. If you have long hair like me, you will want to push the loop forward towards your face to create more room for the back hair.
Step 6: Look closely in this picture and you will see that I combined the first section while grabbing a new second section, creating one large second section.
Step 7: Wrap the second section around the headband and pull tightly around the band.
Step 8: Add to the section again to make one larger piece.

Step 9: Wrap the section around the headband, continue process until you reach the back and all hair has been wrapped around at least once leaving the last section hanging out the back. I will discuss what to do with these in Step 11.Wrap other side, beginning at the front and completing steps 1-9 for the left side.
Step 10: Picture should show back of head with space left for wrapping on the head band and both sides hanging down in the back. If you do not have space, then push the hair loops forward towards the face on the headband to create more room for the final pieces. 
Step 11: Begin with the back right side and wrap the remaining hair around the headband until it is completely wrapped.
Step 12: Finish this on both sides until it completely wrapped. As you can see in the picture, there is no headband showing.

Step 13: If you would like loose waves, pull on the hair wrapped around the headband to loosen up the curls.
Step 14: Pull hair on the top of your head to again create fluff and volume.
Step 15: Spray lightly with hair spray to set the style, and use a blowdryer on the low setting to continue drying, if needed, and set the waves.
***Allow to set at least 45 minutes***
Step 16: Begin unrolling hair piece by piece from the back. 

Step 17: Unroll the entire Right side, then begin unrolling hair piece by piece from the back on the Left Side.
Step 18-19: Finish unrolling both sides, smooth waves with fingers, and take headband off.
Step 20: Use hair spray to set the waves and pin if you like!

The tighter you pull the hair around the headband, the tighter your curls, and the longer you allow them to set, the tighter they will be! Feel free to play with this hair method to create many looks!

For more on Kate

How To: Fill A Large Wall

22 October 2012

This wall has been driving me nuts. 

Actually, figuring out what to do it has actually made me want to beat my head against a wall. Specifically this one. Not only is this the longest wall in the house, but we have pretty high ceilings for an older home, and that has only added to the expanse of space to fill. 

I have racked my brain for ideas, from a grouping of large canvases ($$) to framing up a large graphic fabric shower curtain to mimic a painted camvas, to wall tapestries. I attempted the shower curtain, but felt like it still didn't do the wall justice. I tried leaving it blank for a while and it just ate me up. Something had to be done, but I just couldn't decide on what.

Shower curtain attempt
The room felt incomplete, and because the home is a rental, I couldn't do anything permanent or drastic, like wallpaper or just knock it down. Lord knows I wanted to. I contemplated painting a mural of some sort, but cringed at the idea of my landlord seeing it and blowing an artery and having to repaint. Well, maybe I smiled a bit. She's kind of a pill. But once the mural idea was set in my brain, I knew I had to find a way to execute it.

I remembered entertaining the idea of using a wall decal for a headboard a while back, and thought I'd look into something I could use on a larger space. Now, I know most of you think 'wall decal' and think of those obnoxious FatHead commercials for oversized stickers of sports figures in action. But they actually can be done right. 

I searched on Etsy and found a great selection of vinyl wall stickers that can be arranged based on your creative whims. I love all things birch tree, so it seemed a natural choice to use a leafless birch forest for our dining room. I found my specific set here, but there are tons of styles to choose from, including chevron/geometric, animals, nature inspired, ocean, geography, kids, writing, wildlife, etc. The initial price shocked me, but when I considered the time involved of painting vs decals, and how much work would go into painting and then covering the artwork, I chose the easy-ish route. 

 So, what constitutes as 'easy-ish', you ask? Well, here's a quick how to guide of how I put this together. 

1. First of all, the decals come sandwiched between white contact paper and a semi opaque sticky layer. 

2. The trees came in rolls with multiple branches and trunks on one sheet. I cut them out individually and laid them out on the floor in the pattern that I wanted.

3. After tacking them up to the wall using blue painter's tape (white contact paper side against wall), I made sure they were spaced properly and the arrangement looked as good up as it did on the floor.

4. Starting with the center tree, I removed around 6 inches of white paper backing and starting from the top and smoothed down the decal on the wall using the pinky edge of my hand to eliminate bubbles.

5. Once secured, I continued to remove 2 feet long sections of backing and methodically smoothing the decal to the wall using a top down motion.

6. After the entire tree was applied, I went back to the top and firmly smoothed over the decal through the sticky contact paper using a small dish scraper blade (you can use a squeegee blade too). Don't be afraid to use a decent amount of pressure.

7. Using a slow, controlled movement, I pulled straight down on the tacky paper, keeping as close to the wall as possible, folding under as I went to keep the paper from sticking to my face.

8. Be careful when moving over corners or spaces, like the cuts on the sides of the trees. They have a tendency to want to peel off and may result in sticking to themselves, which renders them ruined.

9. After peeling the tacky paper off, make sure to run your hand over the decal once more to secure any loose sides that may have popped up in the process.

And then, you have this:
Related Posts Plugin for WordPress, Blogger...
Proudly designed by Mlekoshi playground