{How To} Make Antler Art

14 November 2012

Micah owns our kitchen. He cooks, sometimes cleans, and generally knows where everything is. When it comes to decor, I make that 110% my domain. 

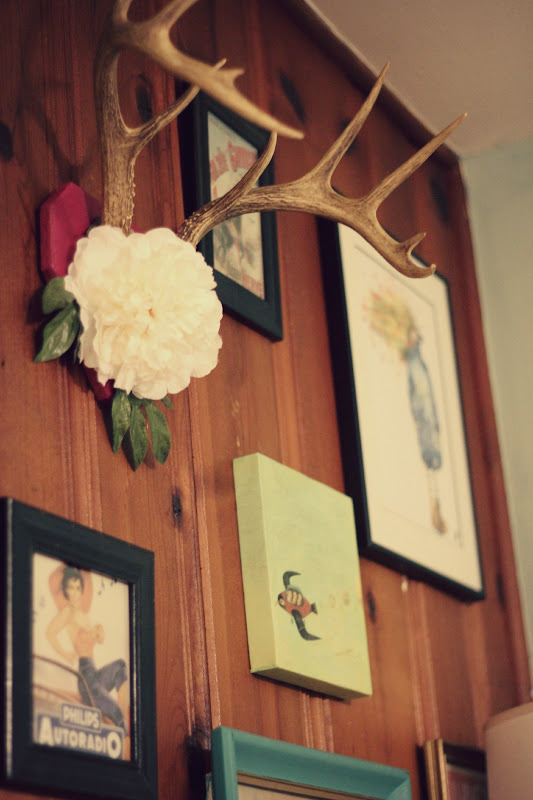
Micah desperately wanted one of his hunting trophies in our home. I protested for quite a while, until finally giving in with some conditions. I told him that if we hung antlers in the house, they'd be "Britt-ified." This means "Color, texture and not hunting lodge style". I brainstormed for a while until I came up with something that would fit nicely on our gallery wall and still suit his desire for horns in the house.

I call this: How To Girlify Dead Animal Heads

 Materials
Antlers
1 large silk flower
Hot glue gun
1. Strip leather from skull and paint wooden base with preferred color. I picked raspberry.
2. Separate all elements of flower, including stem and accompanying buds
3. Arrange design to find what setup works best for you and covers the skull
4Wrap greenery around side of skull, using pea sized dots of glue to secure
5. Place flower on skull, then secure with more pea sized glue drops, fully covering the skull.
6. Hang and enjoy!

Linking Up: RebeccaJen, Cindy,Ashley,TCB,Kristin, Kristyn, Kim,Trish/Bonnie,

Berry Good

12 November 2012

{Blazer}  Target  {Sweater} Gap Outlet  {Pants} Gap Outlet
{Boots} Target  {Necklace} Embellish  {Bangle} Thrifted

This is one of those outfits that seem to have a little of everything that I love about fall.

Blazer- Check
Skinnies- Check
Boots- Check
Lots of color- Check
Something marigold- Check

I'd say the only thing missing is a scarf, but I couldn't bear to cover my first official 'blogger necklace'. 

In other news, Micah and I got a wild hair and bought tennis racquets at Goodwill the other day. Sidenote: neither of us know how/have ever played before. I attempted racquetball once and was rendered deaf and nearly dead, so I retired early in my career. We both played sports (me: volleyball and softball, him: football, basketball and baseball) and both rock climb, but nothing in our pasts says 'tennis.' But we figured it'd be good exercise, worth a laugh and an inexpensive way to spend time after work. We keep catching ourselves sitting on the couch, building up an ever growing list of shows to DVR. 

Stay tuned for black eye/sprained ankle/something broken.

{Stud Muffin} Greek Turkey Wraps

09 November 2012

 Since I don't eat red meat and Micah is trying to stay away from it, we are having to get pretty creative with turkey, chicken and fish. Micah is a huge fan of Greek food, and I approach it cautiously because of the heavy lamb use. To get me to try it, he made this one day and told me it was just a Greek version of a turkey burger. I jumped in happily, and after I had polished off a wrap, he informed me that all the flavors were Greek. I was pretty impressed, and because the recipe is fairly easy, he wanted to share with you guys. 


Turkey Patty
1 package ground turkey
1/2 bell pepper
1 slice of bread
1/4 cup of milk
1/4 red onion
1/4 cup green onion tops
1 tsp salt
1 tsp pepper
1/2 tsp paprika
1 egg


Yogurt Sauce
1 cup nonfat plain Greek yogurt (I use Fage)
Juice from 1 large lemon
6 mint leaves
1 large basil leaf
1/4 cup diced cucumbers
1/2 tsp salt
1/2 tsp pepper

4 Naan breads, sliced in half
Spinach leaves
Sliced tomato
EVOO

1. Fine chop mint and basil leaves for yogurt sauce

2. Combine all yogurt sauce ingredients in medium bowl and whisk together

3. Refrigerate sauce while preparing meal 

4. Heat oven on lowest setting and place Naan bread on pan to warm

5. Soak slice of bread in milk in large mixing bowl until ready to mix turkey ingredients

6. Chop onions, bell peppers and green onions into very fine mixture

7. Combine all turkey patty ingredients in bowl with bread using hands until evenly distributed

8. Heat large skillet on high with light coating of EVOO in pan

9. Form small coaster sized turkey patty around 1/2" thick and brown evenly until firm on both sides

10. Place in container on top of paper towel as finished to maintain heat

11. Assemble Naan wrap by spreading sauce on bread, add spinach leaves, sliced tomatoes and turkey patty and enjoy!

{Beauty Mark} 15 Minute Dry Cleaner with Bounce

07 November 2012

This isn't your typical beauty review.

Part of your beauty routine, believe it or not, is how you treat your clothing. Sadly, many of my favorite pieces aren't the wash and go variety. Many require hand washing or dry cleaning, and the time and money involved can add up quick. Unless you smell like roses and glisten instead of sweat, you're going to need to wash your clothing. 

In an effort to avoid the fees and hassle of dry cleaning, I sought out a less expensive and much more convenient option. Lucky for me, I don't sweat like a linebacker, so my use and abuse of my high maintenance items is minimal. 15 Minute Dry Cleaner sheets with Bounce are the way I maintain pieces of clothing that are worn for a few hours, have a few wrinkles, and require an over all freshening up. 

These have a light, fresh scent and work beautifully for refreshing clothing after a couple of wears. It helps remove stains, treats multiple fabrics and can serve as a quick pick me up for a last minute outfit change. 
I have used it for freshening up coats and sweaters after summer storage, silk blouses that need a little lift and dress pants that don't necessarily need a deep cleaning before the next wear. I use these a lot to support my Forever 21 habit as well. Many of the items I purchase there can be touchy in the wash, and this prolongs the life of the fabric quality. 

Toss in a couple of similar items into the dryer along with the sheet, turn the heat on medium, and let the magic happen.

 {Find it here and in stores}

Disclaimer: This product was not given to me nor was I compensated for this review in any way. This product was purchased by myself with my money because I felt like it. That's how I roll.

Ranch Dressing

05 November 2012

{Shirt} Forever 21  {Skirt} Thrifted  {Belt} Thrifted 
{Boots}  Sheplers  {Necklace}  Forever 21
{Headband} Gap Outlet

1. Vinegar is my kryptonite. The smell of it elicits some overly dramatic gagging and wretching. Think Hollywood B-movie poisoning scene. I'll actually avoid going into the house if Micah has cleaned the coffee pot with it. Once I thought it was a great idea to put mayonnaise in my hair as a deep conditioning treatment. No one told me it will glue your hair to your head. The only fix? Vinegar. I shudder when I remember the day.

2. I cried on a roller coaster a couple of weeks ago. Like, covered my eyes, hyperventilated and then burst into full on boo hoo sobbing. I hate big drops, but somehow got talked into riding the tallest coaster in Texas. You'd think I have enough sense to say no. I do. But I don't have the pride to say no.
The roller coaster photo is mortifying. 

3. Sometimes I think up a completely random string of words or do a 'unique' little jig when no one is looking, and then wonder if anyone else in the world has done the exact same thing, move for move or word for word.

4. I'm loving the yellow trend right now. However, I'm not loving the name. Mustard? Ew. (See #1 for my reason.) So, blog world, as of now, I'm renaming this color trend. It's marigold. It's so fetch. Spread it like wildfire.

5. Dog paws smell like popcorn to me. And it's the greatest thing in the world.

Linking up with: MMB, Still Being Molly

When the Leaves

02 November 2012

Autumn is my most favorite time of year. 

The air gets crisp, humidity goes down and the holiday season begins. Blazers, boots and scarves become wardrobe staples and the occasional sweater makes an appearance. Comfort food is at its prime, and you're allowed to burn candles that smell like leaves and pumpkin.
Autumn has also been the most heartbreaking of all the seasons for me. Every major break up that I have gone through has been between the months of August and November. While the light dims and the air cools, my heart flutters with excitement, but also with a sense of impending sadness. I remember watching the leaves change and the earth settle in for a long hibernation, and thinking that I'd be spending the holidays alone, left to snuggle up in cozy sweaters and down blankets instead of the arms of the one I was missing. Just as the cologne of a love or the smell of mom's pecan pie can conjure up memories of a love past or childhood holidays, the diminished light and crunching leaves occasionally remind me of a lingering sadness. Yes, I am now happily married with a wonderful husband, but the sting of a love lost never really disappears. 

This could be because I had no real variation in when I experienced a breakup, or have a tendency to tie my memories to smells or seasons or even a specific location.  But for whatever reason, this season has held a bit of melancholy for me.

After many fall seasons spent picking up the pieces of shattered expectations, it has been incredibly refreshing to experience fall with consistent joy and fulfillment. This year, Micah will be helping set up our Christmas tree and will be hanging lights around the house. I will have someone to rave over my spice cake for Thanksgiving, and to explore a pumpkin patch with. I am building new memories during my favorite time of year, and now I'll smile and remember that the seasons past are what brought me here today. 
I'm not a very 'mushy' person who gushes over her love for her husband, but felt like I should share this. Yes there are arguments and power struggles and miscommunications. But at the end of the day, I've got my love to keep me warm.

{How To} Create Loose Waves

01 November 2012

On this blog, I've covered clothes, thrifting, DIY, decor, pets, cooking, and weddings. I have not however, covered beauty outside of a review of a beloved product. So I turned to an old friend who was and is my leading source for beauty. Kate Crisler has worked as a freelance makeup artist, hair stylist, and stylist since 2005 in commercial, HD TV, green screen, music videos, and print. Her experience ranges from the music scene in Nashville, TN to print campaigns in NYC, as well as entertainers to politicians in Philladelphia, PA. 

I have known this lovely lady for what seems like forever. We went to church together from elementary school until high school, in between my family's bouts of moving. Not only is she an artist with a makeup brush, but the girl has the voice of an angel. Seriously. I still listen to her recordings from when she was in high school. Amazing. 

When I saw this picture she posted, I knew I wanted her to do this tutorial on the blog. I would love to incorporate more beauty posts, and Kate would love to be a more regular part of the blog. So, give her some love so I can convince her to stick around.

You can use this styling method to create several different looks. However, in this tutorial I will be showing you how to create loose, voluminous, and soft waves. This is a great method for if you are traveling and have limited packing space or when you need your hair to set while preparing for a party, or if you have an early flight to catch and little time to get ready in the morning: simply sleep with it over night!
 In order to achieve that look, I chose to do this tutorial immediately after I washed and blow-dried my hair. (However you can also do it with wet hair and sleep on it for tighter curls.) 

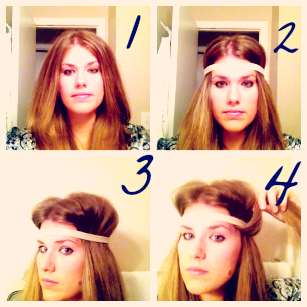
Step 1: Part your hair in the way you will choose to wear it when finished.
Step 2: Choose a loose headband, preferably a cloth one so that it will not pull your hair out, and place it on your head above your eye-brows.
Step 3: Fluff the hair above the headband to create volume.
Step 4: Pull a small section of hair on the right side, pull up and wrap it around the headband. 

Step 5: As shown in picture, pull the hair down from behind the headband until it is tightly wrapped around the headband. If you have long hair like me, you will want to push the loop forward towards your face to create more room for the back hair.
Step 6: Look closely in this picture and you will see that I combined the first section while grabbing a new second section, creating one large second section.
Step 7: Wrap the second section around the headband and pull tightly around the band.
Step 8: Add to the section again to make one larger piece.

Step 9: Wrap the section around the headband, continue process until you reach the back and all hair has been wrapped around at least once leaving the last section hanging out the back. I will discuss what to do with these in Step 11.Wrap other side, beginning at the front and completing steps 1-9 for the left side.
Step 10: Picture should show back of head with space left for wrapping on the head band and both sides hanging down in the back. If you do not have space, then push the hair loops forward towards the face on the headband to create more room for the final pieces. 
Step 11: Begin with the back right side and wrap the remaining hair around the headband until it is completely wrapped.
Step 12: Finish this on both sides until it completely wrapped. As you can see in the picture, there is no headband showing.

Step 13: If you would like loose waves, pull on the hair wrapped around the headband to loosen up the curls.
Step 14: Pull hair on the top of your head to again create fluff and volume.
Step 15: Spray lightly with hair spray to set the style, and use a blowdryer on the low setting to continue drying, if needed, and set the waves.
***Allow to set at least 45 minutes***
Step 16: Begin unrolling hair piece by piece from the back. 

Step 17: Unroll the entire Right side, then begin unrolling hair piece by piece from the back on the Left Side.
Step 18-19: Finish unrolling both sides, smooth waves with fingers, and take headband off.
Step 20: Use hair spray to set the waves and pin if you like!

The tighter you pull the hair around the headband, the tighter your curls, and the longer you allow them to set, the tighter they will be! Feel free to play with this hair method to create many looks!

For more on Kate
Related Posts Plugin for WordPress, Blogger...
Proudly designed by Mlekoshi playground