{How To} Create Loose Waves

01 November 2012

On this blog, I've covered clothes, thrifting, DIY, decor, pets, cooking, and weddings. I have not however, covered beauty outside of a review of a beloved product. So I turned to an old friend who was and is my leading source for beauty. Kate Crisler has worked as a freelance makeup artist, hair stylist, and stylist since 2005 in commercial, HD TV, green screen, music videos, and print. Her experience ranges from the music scene in Nashville, TN to print campaigns in NYC, as well as entertainers to politicians in Philladelphia, PA. 

I have known this lovely lady for what seems like forever. We went to church together from elementary school until high school, in between my family's bouts of moving. Not only is she an artist with a makeup brush, but the girl has the voice of an angel. Seriously. I still listen to her recordings from when she was in high school. Amazing. 

When I saw this picture she posted, I knew I wanted her to do this tutorial on the blog. I would love to incorporate more beauty posts, and Kate would love to be a more regular part of the blog. So, give her some love so I can convince her to stick around.

You can use this styling method to create several different looks. However, in this tutorial I will be showing you how to create loose, voluminous, and soft waves. This is a great method for if you are traveling and have limited packing space or when you need your hair to set while preparing for a party, or if you have an early flight to catch and little time to get ready in the morning: simply sleep with it over night!
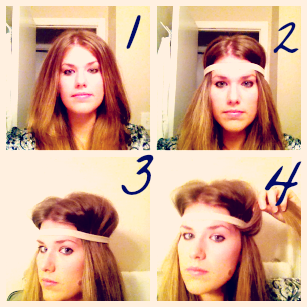
 In order to achieve that look, I chose to do this tutorial immediately after I washed and blow-dried my hair. (However you can also do it with wet hair and sleep on it for tighter curls.) 

Step 1: Part your hair in the way you will choose to wear it when finished.
Step 2: Choose a loose headband, preferably a cloth one so that it will not pull your hair out, and place it on your head above your eye-brows.
Step 3: Fluff the hair above the headband to create volume.
Step 4: Pull a small section of hair on the right side, pull up and wrap it around the headband. 

Step 5: As shown in picture, pull the hair down from behind the headband until it is tightly wrapped around the headband. If you have long hair like me, you will want to push the loop forward towards your face to create more room for the back hair.
Step 6: Look closely in this picture and you will see that I combined the first section while grabbing a new second section, creating one large second section.
Step 7: Wrap the second section around the headband and pull tightly around the band.
Step 8: Add to the section again to make one larger piece.

Step 9: Wrap the section around the headband, continue process until you reach the back and all hair has been wrapped around at least once leaving the last section hanging out the back. I will discuss what to do with these in Step 11.Wrap other side, beginning at the front and completing steps 1-9 for the left side.
Step 10: Picture should show back of head with space left for wrapping on the head band and both sides hanging down in the back. If you do not have space, then push the hair loops forward towards the face on the headband to create more room for the final pieces. 
Step 11: Begin with the back right side and wrap the remaining hair around the headband until it is completely wrapped.
Step 12: Finish this on both sides until it completely wrapped. As you can see in the picture, there is no headband showing.

Step 13: If you would like loose waves, pull on the hair wrapped around the headband to loosen up the curls.
Step 14: Pull hair on the top of your head to again create fluff and volume.
Step 15: Spray lightly with hair spray to set the style, and use a blowdryer on the low setting to continue drying, if needed, and set the waves.
***Allow to set at least 45 minutes***
Step 16: Begin unrolling hair piece by piece from the back. 

Step 17: Unroll the entire Right side, then begin unrolling hair piece by piece from the back on the Left Side.
Step 18-19: Finish unrolling both sides, smooth waves with fingers, and take headband off.
Step 20: Use hair spray to set the waves and pin if you like!

The tighter you pull the hair around the headband, the tighter your curls, and the longer you allow them to set, the tighter they will be! Feel free to play with this hair method to create many looks!

For more on Kate

Soft In My Old Age

29 October 2012


{Jacket} Forever 21  {Tee} Aerie  {Jeans} Gap Outlet 
{Scarf} Forever 21  {Flats} Target

At the ripe age of 26, I find myself growing soft.

Muscle tone is a little bit harder to regain if I choose not to work out for a month, things seem to slide just a bit when I jump on a trampoline and I have to hold back tears over the most trivial of experiences. 

Am I the only one? I feel like lately, things that normally would act as a touching moment have me reaching for a distraction or the fast forward button. The scene in Taken where he makes the birthday scrapbook for his daughter? Lump in my throat. The freaking Google Chrome commercial where the dad and daughter communicate during her freshman year in college? Misty eyes. The other freaking Google Chrome commercial where the dad writes emails to his baby girl every day? Kleenex please. And don't even get me started on the animal shelter commercials. Sarah McLachlan's "Angel" is ruined for me for eternity. I need Xanax to get through all 4 minutes of that commercial.

Yes, I'm still sarcastic, a bit snarky and usually irreverent. I still say things that should probably never progress past a thought that should be kept to myself. But now, I find myself becoming more sensitive and allowing myself to become impacted by emotional experiences. Obviously, I still have to make some wisecrack to distract from the snot bubble forming on the edge of my nose, but inside, I'm all mush.

Dog Days

26 October 2012

If you have ever had a dog that falls short of the incarnation of Mother Theresa and Ghandi's love child, then you understand why I laughed so hard I cried when I read this. 

I figured I can't say it any better than this.

My dog: the paradox


{Beauty Mark:Local Love} Hearts and Robots

24 October 2012

Austin is known for it's weirdness. 

The hipster culture reigns supreme here, and East Austin is quickly becoming the hipster hub. Heck, it was even rated #7 in Forbes' America's Best Hipster Neighborhoods. So, when I made an appointment at a salon named Hearts and Robots, I knew I was getting someone who knew how to do something other than a bleach job and California girl style blowout. Not to say I don't love having blonde beach girl waves, but it's fall, and it's time for something more put together.

A little backstory: I haven't hair a single hair cut from my head in over a year. Due to lack of funds/time, my hair has been sorely neglected. With the presence of a regular paycheck, it was time to get myself back in full working order, starting at the top. I am incredibly nervous about finding new hairstylists, as my curly, dry, fine-textured-but-lots-of-it hair tends to be a diva in the wrong hands.
I found Hearts and Robots via Yelp, and knew instantly that I'd be a long term customer. The over 100 reviews sparkled with happy customers who loved their new hair and their hairstylist. A double bonus. Once I clicked on the website, I found not one but TWO curly hair specialists. Triple bonus. Oh, and did I mention that not only is the salon in an old home full of found treasures {swoon} but they make it a point to provide affordable hair services? My dirt cheap heart nearly exploded from excitement. 
I promptly booked an appointment online, which is incredibly convenient, by the way. A week later, I met up with Stephanie, one of the curly hair specialists, and got right down to it. She spent quite a bit of time talking to me, getting my wishlist, looking at past photos of me with bangs, color ideas, etc. She took the time to get to know my hair, examining the curls and condition and taking my needs/wants and combining them with her expertise. 
Photo via
Within 15 minutes of her beginning the color mixing process, we found ourselves chatting like we'd known each other for years. Lots of laughter, lots of similarities. At one point, we were both holding back tears as we talked about our mothers and their health. We showed each other pictures of our fur babies. We made fun of frat guys with highlights. I mean, we bonded people. How can you not when the woman standing behind you holds the fate of your hair in your hands? She was incredibly easy to chat with, and we had plenty of time to talk, as she had set aside 3 hours just to tend to me.  I felt like a valued customer, not a cow being shot through the chute.
 Another bonus- They just added a beauty trailer, the Gypsy Rose, to the back of their salon! The airstream in Austin is synonymous with 'hipster', and this full service mini salon offers esthetician services like waxing/sugaring, eyelash tint/extensions, facials, etc. So next time I plan on a bang trim/new color/whatevs, I will be booking a lash dye and brow wax to set off the freshly done hair.
Bottom line: I loved her. I loved the salon. I loved the affordability. I'll be back.

How To: Fill A Large Wall

22 October 2012

This wall has been driving me nuts. 

Actually, figuring out what to do it has actually made me want to beat my head against a wall. Specifically this one. Not only is this the longest wall in the house, but we have pretty high ceilings for an older home, and that has only added to the expanse of space to fill. 

I have racked my brain for ideas, from a grouping of large canvases ($$) to framing up a large graphic fabric shower curtain to mimic a painted camvas, to wall tapestries. I attempted the shower curtain, but felt like it still didn't do the wall justice. I tried leaving it blank for a while and it just ate me up. Something had to be done, but I just couldn't decide on what.

Shower curtain attempt
The room felt incomplete, and because the home is a rental, I couldn't do anything permanent or drastic, like wallpaper or just knock it down. Lord knows I wanted to. I contemplated painting a mural of some sort, but cringed at the idea of my landlord seeing it and blowing an artery and having to repaint. Well, maybe I smiled a bit. She's kind of a pill. But once the mural idea was set in my brain, I knew I had to find a way to execute it.

I remembered entertaining the idea of using a wall decal for a headboard a while back, and thought I'd look into something I could use on a larger space. Now, I know most of you think 'wall decal' and think of those obnoxious FatHead commercials for oversized stickers of sports figures in action. But they actually can be done right. 

I searched on Etsy and found a great selection of vinyl wall stickers that can be arranged based on your creative whims. I love all things birch tree, so it seemed a natural choice to use a leafless birch forest for our dining room. I found my specific set here, but there are tons of styles to choose from, including chevron/geometric, animals, nature inspired, ocean, geography, kids, writing, wildlife, etc. The initial price shocked me, but when I considered the time involved of painting vs decals, and how much work would go into painting and then covering the artwork, I chose the easy-ish route. 

 So, what constitutes as 'easy-ish', you ask? Well, here's a quick how to guide of how I put this together. 

1. First of all, the decals come sandwiched between white contact paper and a semi opaque sticky layer. 

2. The trees came in rolls with multiple branches and trunks on one sheet. I cut them out individually and laid them out on the floor in the pattern that I wanted.

3. After tacking them up to the wall using blue painter's tape (white contact paper side against wall), I made sure they were spaced properly and the arrangement looked as good up as it did on the floor.

4. Starting with the center tree, I removed around 6 inches of white paper backing and starting from the top and smoothed down the decal on the wall using the pinky edge of my hand to eliminate bubbles.

5. Once secured, I continued to remove 2 feet long sections of backing and methodically smoothing the decal to the wall using a top down motion.

6. After the entire tree was applied, I went back to the top and firmly smoothed over the decal through the sticky contact paper using a small dish scraper blade (you can use a squeegee blade too). Don't be afraid to use a decent amount of pressure.

7. Using a slow, controlled movement, I pulled straight down on the tacky paper, keeping as close to the wall as possible, folding under as I went to keep the paper from sticking to my face.

8. Be careful when moving over corners or spaces, like the cuts on the sides of the trees. They have a tendency to want to peel off and may result in sticking to themselves, which renders them ruined.

9. After peeling the tacky paper off, make sure to run your hand over the decal once more to secure any loose sides that may have popped up in the process.

And then, you have this:

Heads and Butts

09 October 2012

What's the last thing that goes through a bug's head before they hit the windshield?
Their butt.

Just about describes last week for me. Hence the no posting.

Some randoms today:

1) I have something called Back Mice, and they hurt like hell. Apparently, my back fat is not only unattractive, but it's a real pain in the ass. Literally.
2) On a scale of 1-10, how bad it is to order 2lbs of gummies online simply because I can't seem to run into them in person?
3) I got bangs.


Also, the winner of the Shabby Apple giveaway is Michael Robin! Congrats!

Promises, Promises

01 October 2012

I consider myself a very giving person. 

I am the one on your porch with my three main men Ben, Jerry and Jack (Daniels) at the first sign of a breakup. You can call me and be guaranteed that I will be in on any painting, running errands, watching pets duty, no questions asked. It's a rare instance when I find myself being stingy or less forthcoming with my assistance, but when it happens, consider me stuck in the mud. Not budging. 

Sometimes this happens when I'm pushed to do something, or if I feel taken advantage of. Or when I have to give up clothes. I know I don't wear things anymore, I know they don't fit, I know. I know. That doesn't make me any less inclined to dispose of them.
 I've received a few emails about the Shop My Closet post, and when I will be putting up a link for some pieces. I have a few in mind and have set up a BISTM page this week. It won't be a lot, but it will be some little or never worn pieces mixed in with some fabulous thrifts that I bought because they were just that... fabulous. Maybe not for me, but for you.

So, please, hold me accountable. Because I know once I hold these pieces, feel the fabric between my fingers and think of all the beautiful pretend memories I have in each piece, they may never make it up and into your closet.
Related Posts Plugin for WordPress, Blogger...
Proudly designed by Mlekoshi playground